The Buildbot setup on virtualenv
Buildbot Master のインストール
インストール手順
virtualenv環境を作成してそこにインストールすることにします。
$ mkdir /tmp/bbot
$ cd /tmp/bbot
$ virtualenv ve
$ cd ve
$ source bin/activate
(ve)$ pip install buildbot
(ve)$ buildbot --version
Buildbot version: 0.8.3p1
Twisted version: 11.0.0
virtualenv環境にbuildbotコマンドが作成されました。 オプションなしで実行するとヘルプが表示されます。
(ve)$ buildbot
/tmp/bbot/ve/bin/buildbot:  must specify a command

Usage:    buildbot <command> [command options]
Options:
      --version
      --help     Display this help and exit.
      --verbose
Commands:
    create-master       新しいビルドマスターディレクトリを作成します
    upgrade-master      既存のビルドマスターディレクトリを現在のbuildbot用に
                        アップグレードします
    start               ビルドマスターを起動します
    stop                ビルドマスターを停止します
    restart             ビルドマスターを再起動します
    reconfig            ビルドマスターにSIGHUPを送信して設定を再読込します
    sighup              ビルドマスターにSIGHUPを送信して設定を再読込します
    sendchange          ビルドマスターに変更を通知します
    debugclient         GUIのデバッグパネルを起動します(要gtk)
    statuslog           現在のビルダーの状態をstdoutに出力します
    statusgui           現在のビルダーの状態をGUIウインドウに表示します
    try                 ローカル環境での変更に対してビルドを行います
    tryserver           buildmaster-side 'try' support function, not for users
    checkconfig         master.cfgの内容が正しいか検証します
buildbot設定作成
buildbotのcreate-masterコマンドで環境のひな形を作成します。
$ buildbot create-master var
mkdir /tmp/bbot/ve/var
chdir /tmp/bbot/ve/var
creating master.cfg.sample
populating public_html/
creating Makefile.sample
creating database
buildmaster configured in /tmp/bbot/ve/var

$ ls var
buildbot.tac  Makefile.sample  master.cfg.sample  public_html  state.sqlite

$ copy var/master.cfg.sample var/master.cfg
ここでコピーしたmaster.cfgはpyflakesというPythonパッケージをテストするように設定されています。中を見ると、Web表示用に8010番ポートを使用しているようです。試しにこのまま実行してみましょう。
$ buildbot start var
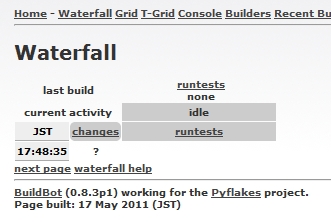
ブラウザで http://localhost:8010/ にアクセスしてみてください。 Buildbotのページが表示されたら成功です。
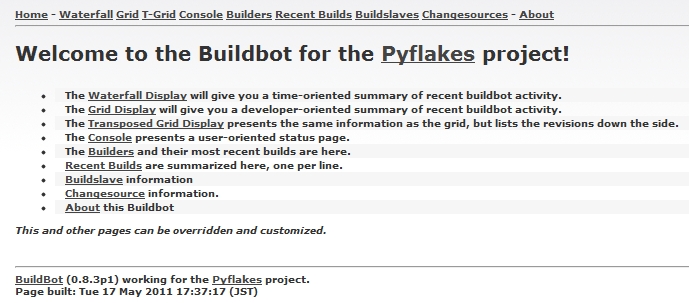
waterfall-view
Buildbot Slave のインストール
インストール手順
Masterと同じvirtualenv環境にインストールして動かしてみます。 本来はSlaveからMasterに接続できればどこのサーバーで動作していてもかまいません。
$ cd /tmp/bbot/ve
$ source bin/activate
(ve)$ pip install buildbot_slave
(ve)$ buildslave --version
Buildslave version: 0.8.3
Twisted version: 11.0.0
virtualenv環境にbuildslaveコマンドが作成されました。 オプションなしで実行するとヘルプが表示されます。
(ve)$ buildslave
/tmp/bbot/ve/bin/buildslave:  must specify a command

Usage:    buildslave <command> [command options]
Options:
      --version
      --help     Display this help and exit.
      --verbose
Commands:
    create-slave       新しいビルドスレーブディレクトリを作成します
    upgrade-slave      既存のビルドスレーブディレクトリを現在のbuildslave用に
                       アップグレードします
    start              ビルドスレーブを起動します
    stop               ビルドスレーブを停止します
    restart            ビルドスレーブを再起動します
buildslave設定作成
slave環境を作成します。
(ve)$ buildslave create-slave
/tmp/bbot/ve/bin/buildslave:  command needs more arguments

Usage:    buildslave create-slave [options] <basedir> <master> <name> <passwd>
buildslaveのcreate-slaveコマンドはさらにいくつかオプションが必要です。 var/master.cfg を見て、basedir(slave作成dir名), master(接続用ポート番号), name(認証ID), passwd(認証passwd) を指定してください。
(ve)$ buildslave create-slave var2 localhost:9989 example-slave pass
(ve)$ ls var2
buildbot.tac  info
slaveはこれ以上設定する項目はありません。 以下のコマンドで起動します。
(ve)$ buildslave start var2
Following twistd.log until startup finished..
2011-05-17 16:12:48+0900 [-] Log opened.
2011-05-17 16:12:48+0900 [-] twistd 11.0.0 (/tmp/bbot/ve/bin/python 2.4.3) starting up.
2011-05-17 16:12:48+0900 [-] reactor class: twisted.internet.selectreactor.SelectReactor.
2011-05-17 16:12:48+0900 [-] Starting factory <buildslave.bot.BotFactory instance at 0x851ff38>
2011-05-17 16:12:48+0900 [-] Connecting to localhost:9989
2011-05-17 16:12:48+0900 [Broker,client] message from master: attached
The buildslave appears to have (re)started correctly.
上記のように、最後に started correctly と表示されていれば起動成功です。
エラーが発生している場合、もうちょっと長い文面が表示されます。
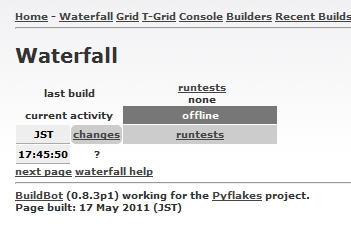
Buildbotページの確認
ブラウザで http://localhost:8010/ にアクセスしてみてください。 先ほどと異なり、slaveが追加されているはずです。
Blockdiagをテストしてみる
以下のようにvar/master.cfgを書き換えます。 なお、この例では /home/taka/svn リポジトリに /trunk/blockdiag をコミットしている前提です。
--- var/master.cfg.old  2011-05-17 17:43:29.000000000 +0900
+++ var/master.cfg      2011-05-17 17:44:28.000000000 +0900
@@ -26,15 +26,10 @@
 # the 'change_source' setting tells the buildmaster how it should find out
 # about source code changes.  Here we point to the buildbot clone of pyflakes.

-from buildbot.changes.gitpoller import GitPoller
-c['change_source'] = GitPoller(
-        'git://github.com/buildbot/pyflakes.git',
-        branch='master', pollinterval=1200)
+from buildbot.changes.svnpoller import SVNPoller
+c['change_source'] = SVNPoller(
+       svnurl="file:///home/taka/svn/trunk/blockdiag",
+       pollinterval=60)

 ####### SCHEDULERS

@@ -54,16 +49,14 @@
 # only take place on one slave.

 from buildbot.process.factory import BuildFactory
-from buildbot.steps.source import Git
-from buildbot.steps.shell import ShellCommand
+from buildbot.steps.source import SVN
+from buildbot.steps.shell import ShellCommand, Configure, Compile, Test

 factory = BuildFactory()
 # check out the source
-factory.addStep(Git(repourl='git://github.com/buildbot/pyflakes.git', mode='copy'))
+factory.addStep(SVN(svnurl='file:///home/taka/svn/trunk/blockdiag'))
 # run the tests (note that this will require that 'trial' is installed)
-factory.addStep(ShellCommand(command=["trial", "pyflakes"]))
+factory.addStep(Configure(command=["/usr/bin/python", "bootstrap.py","-d", "init"]))
+factory.addStep(Compile(command=["bin/buildout", "-v"]))
+factory.addStep(Test(command=["bin/test"]))
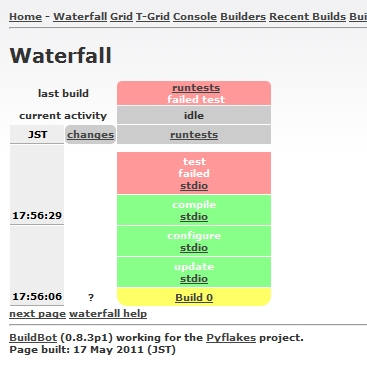
Buildbotを再起動します。
$ buildbot restart var
Web上でForce Buildボタンを押すとリビジョン更新が無くてもテストが実行され、以下のように結果が表示されます。